
There’s nothing quite like digging into chocolate lava cake and watching that warm, molten chocolate center spill out. This small-batch chocolate lava cake recipe is perfect for just two people, making it ideal for Valentine's Day, date nights, special occasions, or those nights when you just want to treat yourself (a little).
But let’s talk about the most important thing: the gooey center. It’s easy to overbake and end up with a regular chocolate cake (which is still delicious -- but not the point). This post is designed to help you nail the lava part to make sure you get that perfect molten lava cake flow every time.
Watch The How-To Video
Jump to:
The "Secret" To The Perfect Molten Center
The magic of lava cake is in the timing. If you bake it too long, the molten center disappears. Too little, and you might have a mess on your hands. Here’s how to get it just right:
1. Keep an Eye on the Clock
Every oven is a little different, so start checking around the 7-minute mark. You want the edges to look set, but the center should still have a little jiggle when you gently shake the ramekin. If it looks fully cooked, you’ve gone too far!
2. Choose the Right Bakeware
This recipe is designed for two small 6-ounce ramekins, but you can also use oven-safe mugs or even a muffin tin. Just remember, smaller dishes bake faster, so adjust baking time accordingly.
3. Let it Rest (But Just for a Minute!)
Once they come out of the oven, let the cakes sit for about a minute before inverting them onto a plate (definitely use oven mitts for this part). This quick rest helps them hold their shape while still keeping that luscious molten center.

Use Quality Ingredients For This Chocolate Lava Cake Recipe
Lava cake is all about rich, deep chocolate flavor, and that comes down to using the best ingredients. Here’s what makes a difference:
1. Pick a good dark chocolate
Not all chocolate is created equal! Skip the bittersweet chocolate chips and go for a high-quality dark chocolate with at least 65% cocoa. The richer the chocolate, the more decadent the cake. My favorite baking chocolate is Valrhona, but it's definitely on the pricier side. Ghirardelli bars work great, too.
2. Use European Butter
European butter has a higher butter fat content (about 82%) vs. the American standard of 80%. This is obviously optional, but a great add, especially if you're making these cakes for a special occasion. Use unsalted butter for the best control over flavor. I love Plugra butter.
3. Room-Temperature Eggs (Don't Skip This)
Cold eggs don’t mix as well, which can mess with the texture of your cake. Let your large eggs sit out for about 30 minutes before starting.
Why You’ll Love This Chocolate Lava Cake Recipe:
- Fresh Every Time – No reheating needed, just pure melty goodness.
- Portion Control – Just enough to satisfy without going overboard.
- Perfect for Sharing – Whether it’s a romantic night or a bestie dessert date, it’s made for two.
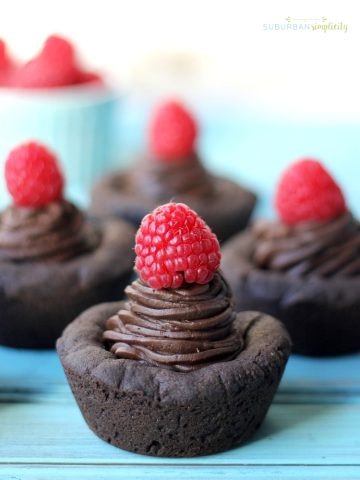
How To Garnish Your Lava Cakes
Fresh Raspberries – Adds a little tartness to balance the sweetness.
Powdered Sugar – A simple, aesthetic choice.
Whipped Cream – Light, airy, and the perfect contrast to warm chocolate.
Vanilla Ice Cream – That hot-and-cold combo is unbeatable. This is my number one choice for serving, followed closely by:
Caramel Sauce - Because who doesn't love caramel and chocolate together?

Step-by-Step Instructions For This Chocolate Lava Cake Recipe
- Prep: Preheat your oven to 425°F (218°C). Butter two ramekins generously, ensuring all surfaces are coated. Sprinkle the inside with granulated sugar, tapping out the excess. This will help the cakes release easily.
- Melt the Chocolate and Butter: In a microwave-safe bowl, combine the dark chocolate and butter. Heat in 20-second intervals, stirring between each, until fully melted and smooth. Set aside to cool slightly.
- Make the Batter: In a medium mixing bowl, whisk together the egg, egg yolk, granulated sugar, and vanilla extract until thick and pale, about 2 minutes. Slowly whisk in the melted chocolate mixture until combined. Add the salt and flour, gently folding until no streaks remain.
- Fill the Ramekins and Bake: Divide the batter evenly between the prepared ramekins. Place them on a baking sheet for easy handling. Bake for 8-9 minutes, or until the edges are set but the centers are still soft and jiggly. You don’t want to overbake, or you won’t have the lava! Remove from the oven and let the cakes rest for 1 minute.
- Serve: Run a knife around the edges of the ramekins to loosen the cakes. Invert each ramekin onto a plate, wait a few seconds, give the bottom a couple of taps, and then gently lift it off. Serve immediately topped with powdered sugar, whipped cream, or ice cream

Troubleshooting
Here are some common issues that people have with lava cake:
1. Cake Sticks to the Ramekin
- Solution: Be generous with the butter and sugar when prepping the ramekin. Also, tapping the bottom after inverting helps!
2. The Center is Too Runny
- Solution: Your oven might be running a little cool, or the cake needed another minute. Try baking it just a tiny bit longer next time.
3. No Lava (Cake is Overbaked!)
- Solution: Bake for a minute or two less next time and check for that signature jiggle in the center before taking it out.

Other Chocolatey Goodies You'll Love!


Love this recipe? Please leave a 5-star ⭐️⭐️⭐️⭐️⭐️ rating in the recipe card below ⬇️ and/or a review in the comment section further down.
Hungry for more? Follow Suburban Simplicity on Facebook, Instagram, YouTube, and Pinterest to see more DIYs, recipes, and home tips!
Also, don't forget to sign up for email!
I only send one email a week, and it'll include my latest recipes, DIYs, and tips, information about exclusive "email only" giveaways, and more! See form below!
Want to subscribe to the Suburban Simplicity Recipe Club? It's only $5 per month, and you'll get ad-free PDFs of any new recipes that I post while supporting me at the same time! Join the club, here.
Printable Recipe

Chocolate Lava Cake For 2
Equipment
- Rubber spatula
- 2 mixing bowls
- 2 6-ounce ramekins
Ingredients
- 3 ounces dark chocolate
- 2 ½ tablespoons butter (plus more for prepping ramekins)
- 1 large egg (room temperature)
- 1 large egg yolk (room temperature)
- 3 tablespoons granulated sugar (plus more for ramekins)
- ½ teaspoon pure vanilla extract
- ⅛ teaspoon salt
- 2 ½ tablespoons all-purpose flour
Instructions
- Prep: Preheat your oven to 425°F (218°C). Butter two ramekins generously, ensuring all surfaces are coated. Sprinkle the inside with granulated sugar, tapping out the excess. This will help the cakes release easily.
- Melt the Chocolate and Butter: In a microwave-safe bowl, combine the dark chocolate and butter. Heat in 20-second intervals, stirring between each, until fully melted and smooth. Set aside to cool slightly.
- Make the Batter: In a medium mixing bowl, whisk together the egg, egg yolk, granulated sugar, and vanilla extract until thick and pale, about 2 minutes. Slowly whisk in the melted chocolate mixture until combined. Add the salt and flour, gently folding until no streaks remain.
- Fill the Ramekins and Bake: Divide the batter evenly between the prepared ramekins. Place them on a baking sheet for easy handling. Bake for 8-9 minutes, or until the edges are set but the centers are still soft and jiggly. You don’t want to overbake, or you won’t have the lava! Remove from the oven and let the cakes rest for 1 minute.
- Serve: Run a knife around the edges of the ramekins to loosen the cakes. Invert each ramekin onto a plate, wait a few seconds, give the bottom a couple of taps, and then gently lift it off. Serve immediately topped with powdered sugar, whipped cream, or ice cream.
Video
Notes
- Room-temperature eggs are crucial for achieving a smooth batter and a well-risen cake.
- Watch the cakes closely; overbaking will eliminate the gooey center. The perfect timing depends on your oven, so start checking at 7 minutes.
- Use oven-safe mugs or muffin tins as alternatives. Adjust baking time if using smaller or larger vessels.


Leave a Reply